
Table of Contents
The main goal of this article is to deal with the initial configuration of a new application using four technologies: NestJS, TypeScript, Docker, and TypeORM. We will make a skeleton for an API server.
For the backend, we will use Node.js with the NestJS framework (for building server-side applications). As a database, we will use PostgreSQL and we will run the application in a Docker container. Let’s go!
Required Technologies
Node.js
First of all, we need to install runtime to run our JavaScript code on a local machine. I strongly encourage you to visit the official documentation and install the LTS version (at the time of writing this article, the LTS version is 16.14.2) for your machine.
Docker
In the end, we want to run this application in a Docker container. We have to somehow dockerize our API server and connect with the database.
We will use PostgreSQL and, with Docker, we don’t have to install Postgres on the computer – we will create an appropriate container based on the official image.
If you know nothing about Docker, that’s not a problem. Here have prepared an article that shows how to create your first Docker application. It’s not necessary to know everything that Docker offers.
NestJS
Last but not least is to install the CLI for the NestJS framework. You might want to check out the official documentation. Personally, I love the NestJS framework because it makes it easy to make a good API server and it uses TypeScript by default.
Creating the NestJS Application
Go to your terminal, create an appropriate directory and navigate to it. If you have installed the NestJS CLI, you can just type:
nest new skeleton-appThis command will ask you about the package manager. I will use npm but feel free to choose yarn if you prefer. After installation you can check if the base server is ok, so type:
cd skeleton-app
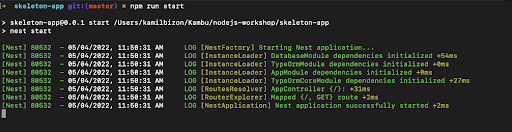
npm run startYou should see that server is running, but this is only the beginning of our journey:
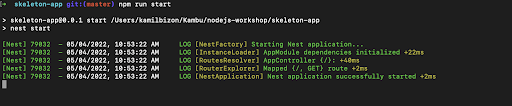
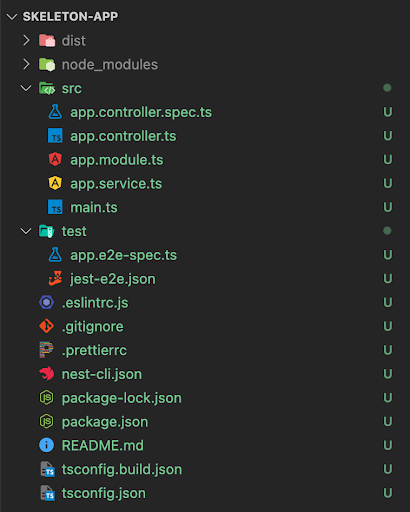
You can see that Nest CLI created all structures including tests files (*.spec.ts), config files (eslintrc.js or .prettierrc), and the base structure of our application:
It looks like we’ve got the first step, but the fun is just beginning. We have to somehow connect our super-simple API server with the database.
Getting PostgreSQL
As I said before, you don’t have to be a master of Docker or SQL. Often knowledge and full understanding come with time, so don’t worry about this section. We will config this one time and it will work for the rest of the implementation.
We could run only one Docker image with PostgreSQL, but in the end, we want to run both backend and database in Docker, so we will use docker-compose, which allows us to run several images in one container.
Create a file called docker-compose.yml in the main directory (skeleton-app) and paste the config for the Postgres service:
version: '3.8'

networks:
 default:
   external: false
   name: skeleton-app-local

services:
 skeleton-app-postgres:
   image: "postgres:13-alpine"
   command: postgres -c 'max_connections=1000'
   restart: always
   container_name: skeleton-app-postgres-local
   environment:
     - POSTGRES_PASSWORD=postgres
     - POSTGRES_USER=postgres
     - POSTGRES_DB=skeleton_app_db_local
   volumes:
     - ./db_data:/var/lib/postgresql/data
   ports:
     - "5432:5432"
This will create a database from the original image of Postgres and configuration (password, database name, etc.), which we will use in the next steps. Save the file and run this terminal command:
docker-compose up -dThis command will run our docker-compose, which at the moment has only one service and it is a database service. You should see something similar to this:

You can check if all is correct by typing docker container ls (you will see that on port 5432 is running an instance of postgres database) or you can check in any GUI for databases (I am using DBeaver). We have a running database so now we can connect our application with it.
In the second part of this tutorial, we will move the Postgres environment variables to a *.env file to make it clearer.
Connecting NestJS and PostgreSQL – TypeORM
We want to use a database in our application, so we need to somehow connect our simple app with the database, which is running on port 5432 now. We will use TypeORM for this purpose. NestJS supports TypeORM, so we need to install 3 packages. As the official documentation says, we have to install:
- @nestjs/typeorm – which is the Nest integration with TypeORM
- typeorm@0.2 – which is just an ORM package
- and pg – we will use PostgreSQL, so we need drivers for this database.
Now we can install these packages, by typing in the terminal:
npm install --save @nestjs/typeorm typeorm@0.2 pgIf everything is alright, our next steps are:
- Make a database config
- Create database module for NestJS
- Import database module to our NestJS app (automatically made by the Nest CLI)
Creating Database Config
For now, we are going to create a *.js file with config. In the next tutorial, we will rewrite this to an *.env file. In addition, in the ./src directory we want to organize the application structure. It’s up to you how you make it, my suggestion is something similar to this:
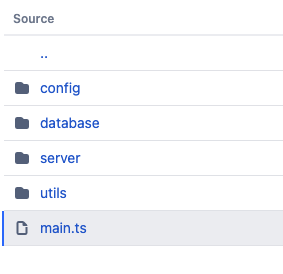
We want to separate database things, server (controllers, services, etc.), utils (e.g. with global enums), etc. That’s why we don’t want to have all files in one directory.
Create a file named config.js in ./src/config:
const application = {
 env: 'development',
 port: 5000,
};

const database = {
 host: 'localhost',
 port: 5432,
 username: 'postgres',
 password: 'postgres',
 name: 'skeleton_app_db_local',
};

module.exports = {
 application,
 database,
};
This file is just temporary, we will move all the things to *.env file in the future.
Creating Database Module
The next step is creating a database module for NestJS. In order to do that type in a terminal:
nest g module databaseNest CLI will create an appropriate directory with a module file and automatically import it to the main app.module.ts. If you want to check what you can do with Nest CLI, just visit their documentation, it is very helpful.
Updating Module With Correct Data
After CLI has created for us database.module.ts, we can fill it with our correct config data. We can do it with several lines of code:
import { Module } from '@nestjs/common';
import { TypeOrmModule } from '@nestjs/typeorm';
import { database } from '../config/config.js';

@Module({
 imports: [
   TypeOrmModule.forRoot({
     type: 'postgres',
     host: database.host,
     port: database.port,
     username: database.username,
     password: database.password,
     database: database.name,
     entities: [__dirname + '/../**/*.entity.js'],
     synchronize: false,
   }),
 ],
})
export class DatabaseModule {}
The important line is synchronize: false – this line disables automatic migrations. For production applications you want it to be false, because you can very easily break database structure/data. We will use migrations to be 100% sure that we are updating the database correctly. And we want to create migrations even when we are at the development stage – for good practices.
If we run npm run start we will get an error. Because we’ve made a *.js file in ./src/config and our tsconfig.json does not allow us to import *.js files. So we have to add a line at the end of tsconfig.json:
"allowJs": trueSo our tsconfig.json file should look like this:
 {
 "compilerOptions": {
   "module": "commonjs",
   "declaration": true,
   "removeComments": true,
   "emitDecoratorMetadata": true,
   "experimentalDecorators": true,
   "allowSyntheticDefaultImports": true,
   "target": "es2017",
   "sourceMap": true,
   "outDir": "./dist",
   "baseUrl": "./",
   "incremental": true,
   "skipLibCheck": true,
   "strictNullChecks": false,
   "noImplicitAny": false,
   "strictBindCallApply": false,
   "forceConsistentCasingInFileNames": false,
   "noFallthroughCasesInSwitch": false,
   "allowJs": true
 }
}
Then restart the server and you should have a running server that is connected to the database!
Recap – Basic Node.js Server
In this first part, we have done several things. We have:
- installed Node.js runtime and Docker,
- installed NestJS CLI,
- created PostgreSQL instance which is running in Docker container
- installed TypeORM and connect with our NestJS server
In the next article I will:
- move the configuration from ./src/config/config.js to *.env file
- make security things like CORS or correct headers
- build the Docker image of our NestJS server and run it in one container with PostgreSQL