
Table of Contents
In the previous article, I have described the Dapr (distributed application runtime). There was just a lot of theory, and it’s about time to see how it actually works. So let’s build and connect two Dapr example applications.
Those applications will show that, even with simple usage of Dapr, we can get and mutate states, and use messaging to perform some operations.
Blog Series – Dapr And Microservices
Part 1: Introduction | Part 2: Demo | Part 3: Hosting and Deployment
Dapr Example 1) Bank App – ASP.NET Core

We are going to have a bank application and perform some super insecure operations such as:
- Checking account balance
- Depositing money
- Withdrawing money
After creating a simple ASP.NET Core app (from the WebApi template), we need to enable Dapr. To do that, first, let’s just install Dapr.AspNetCore Nuget Package.
After installing it, let’s just tell ASP.NET Core that we are going to use it.
We begin with the Startup of our ASP.NET Core Bank Application.
Bank App – Startup.cs
public class Startup
{
   public Startup(IConfiguration configuration)
   {
       this.Configuration = configuration;
   }

   public IConfiguration Configuration { get; }

   public void ConfigureServices(IServiceCollection services)
   {
       services.AddControllers().AddDapr(); //Enable Dapr
   }

   public void Configure(IApplicationBuilder app, IWebHostEnvironment env)
   {
       if (env.IsDevelopment())
       {
           app.UseDeveloperExceptionPage();
       }

       app.UseRouting();

       app.UseCloudEvents(); //Enable Middleware for reading Cloud Events as Requests

       app.UseEndpoints(endpoints =>
       {
           endpoints.MapSubscribeHandler(); //Enable Publish-Subscribe handler (from Dapr)
           endpoints.MapControllers();
       });
   }
}
That’s really it. It’s just one line of code to add Dapr, and two lines of code to add the message-broker usage.
As I said previously, this is going to be a Bank app, so we need to add some Domain-models first to call it like that.
Bank App – Transaction.cs
/// <summary>
/// Represents a transaction used by sample code.
/// </summary>
public class Transaction
{
   /// <summary>
   /// Gets or sets account id for the transaction.
   /// </summary>
   [Required]
   public string Id { get; set; }

   /// <summary>
   /// Gets or sets amount for the transaction.
   /// </summary>
   [Range(0, double.MaxValue)]
   public decimal Amount { get; set; }
}
Bank App – Account.cs
public class Account
{
   /// <summary>
   /// Gets or sets account id.
   /// </summary>
   public string Id { get; set; }

   /// <summary>
   /// Gets or sets account balance.
   /// </summary>
   public decimal Balance { get; set; }
}
Let’s add a SampleController – controller using Dapr to perform our super-insecure bank operations.
In the constructor, we inject ILogger (out of Microsoft.Extensions.Logging) for logging purposes, and DaprClient (out of Dapr.Client). We are going to use some state store from Dapr to store and mutate state.
Bank App – SampleController.cs – Constructor part
public SampleController(ILogger<SampleController> logger, DaprClient daprClient)
{
   _logger = logger;
   _daprClient = daprClient;
}

public const string StoreName = "statestore"; //name of the state store
private readonly ILogger<SampleController> _logger;
private readonly DaprClient _daprClient;
In our Get method, we are getting entry out of the state store (via [FromState(StoreName)] attribute in method parameters).
When the user gives us an identifier of the account, we try to get it from the state, and if the bank account exists, we simply return the current balance.
Bank App – SampleController.cs – Get method part
/// <summary>
/// Gets the account information as specified by the id.
/// </summary>
/// <param name="account">Account information for the id from Dapr state store.</param>
/// <returns>Account information.</returns>
[HttpGet("{account}")]
public ActionResult<Account> Get([FromState(StoreName)] StateEntry<Account> account)
{
   if (account.Value is null)
   {
       return this.NotFound();
   }

   return account.Value;
}
The next thing is depositing some money into our account. We are getting Account out of state store from Id parameter out of Transaction model (coming from request).
To avoid some additional methods for opening a bank account, we do it when depositing some money. That’s why we are assigning default values for the state.
Then we simply add the amount of money given in the request and save changes. In the end, we return the current account status.
Bank App – SampleController.cs – Deposit method part
/// <summary>
/// Method for depositing to account as specified in transaction.
/// </summary>
/// <param name="transaction">Transaction info.</param>
/// <param name="daprClient">State client to interact with Dapr runtime.</param>
/// <returns>A <see cref="Task{TResult}"/> representing the result of the asynchronous operation.</returns>
///  "pubsub", the first parameter into the Topic attribute, is name of the default pub/sub configured by the Dapr CLI.
[Topic("pubsub", "deposit")]
[HttpPost("deposit")]
public async Task<ActionResult<Account>> Deposit(Transaction transaction)
{
   _logger.LogDebug("Enter deposit");
   var state = await _daprClient.GetStateEntryAsync<Account>(StoreName, transaction.Id);
   state.Value ??= new Account() { Id = transaction.Id, };
   state.Value.Balance += transaction.Amount;
   await state.SaveAsync();
   return state.Value;
}
When it comes to withdrawing money from an account, it’s pretty similar to our deposit method.
The difference is we are just withdrawing money instead of depositing it – we are just updating state entry value and saving the changes at the end.
Bank App – SampleController.cs – Withdraw method part
/// <summary>
/// Method for withdrawing from account as specified in transaction.
/// </summary>
/// <param name="transaction">Transaction info.</param>
/// <param name="daprClient">State client to interact with Dapr runtime.</param>
/// <returns>A <see cref="Task{TResult}"/> representing the result of the asynchronous operation.</returns>
///  "pubsub", the first parameter into the Topic attribute, is name of the default pub/sub configured by the Dapr CLI.
[Topic("pubsub", "withdraw")]
[HttpPost("withdraw")]
public async Task<ActionResult<Account>> Withdraw(Transaction transaction)
{
   _logger.LogDebug("Enter withdraw");
   var state = await _daprClient.GetStateEntryAsync<Account>(StoreName, transaction.Id);

   if (state.Value == null)
   {
       return this.NotFound();
   }

   if (state.Value.Balance < transaction.Amount)
   {
       return BadRequest("Whoa! Wait, you don't have that much");
   }

   state.Value.Balance -= transaction.Amount;
   await state.SaveAsync();
   return state.Value;
}
Great! We just implement a way on how to perform basic bank operations.
You are wondering what are those Topic attributes over Deposit/Withdraw methods?
This is just a way of telling Dapr “Hey, this is a method used in the message-broker [or pub/sub in terms of Dapr] and you can access it under ‘deposit’ or ‘withdraw’.”
Yeah, this is all you have to do to add message-broker support.
Dapr Example 2) Payday App – Console Application

To simulate the magic, we can always send some requests. But to show the power of Dapr and how great it actually is, we are going to create some simulations of users.
Let’s create a Console application that is going to send requests to our Bank ASP.NET Core Application.
For this demo only, we are going to have everything in one file to make it easy to understand and to not overcomplicate it.
First, we just need to install Dapr.Client Nuget Package. Here we also need to define a ‘Transaction’ model (the same as in our ASP.NET Core Application).
Payday App – Console Application
static async Task Main(string[] args)
{
   var daprClient = new DaprClientBuilder().Build();
   daprClient.JsonSerializerOptions.PropertyNamingPolicy = JsonNamingPolicy.CamelCase;
   var random = new Random();
   for (var i = 0; i < 10; i++)
   {
       var transaction = new Transaction
       {
           Id = "1",
           Amount = Math.Round((decimal) random.NextDouble() * 1000, 2)
       };
       Console.WriteLine($"I am about to deposit {transaction.Amount} to my account");
       await daprClient.PublishEventAsync<Transaction>("pubsub", "deposit", transaction);
       Console.WriteLine($"I've deposited {transaction.Amount} to my account");
       await Task.Delay(5000);
   }
   Console.WriteLine("Great! Payday has finished. It's time to spend something!");

   for (var i = 0; i < 10; i++)
   {
       var transaction = new Transaction
       {
           Id = "1",
           Amount = Math.Round((decimal) random.NextDouble() * 1000, 2)
       };
       Console.WriteLine($"I am about to withdraw {transaction.Amount} out of the bank");
       await daprClient.PublishEventAsync<Transaction>("pubsub", "withdraw", transaction);
       Console.WriteLine($"I've withdrawn {transaction.Amount} out of the bank");
       await Task.Delay(5000);
   }
}
This code is going to use a message broker (pub/sub in terms of Dapr). We are going to generate some random transactions first to deposit some money, and then take some of it.
This is how simple it is to use other Dapr applications to make some operations without taking care of message-broker setup and other bug-prone things.
It’s time to launch it. But first, you need to install Dapr to actually run those applications.
Setting Up Dapr
Dapr documentation provides a pretty good tutorial on how to install the Dapr.
I’m going to show you how to install Dapr on Windows, but of course, it is supported on other platforms.
We are going to launch Command Prompt as administrator, and launch one-line magic command:
Payday App – Install dapr-cli on Windows command
powershell -Command "iwr -useb https://raw.githubusercontent.com/dapr/cli/master/install/install.ps1 | iex"After launching it, we can check if the Dapr was installed successfully by just launching the dapr command, which should look like this:
         __
    ____/ /___ _____  _____
   / __  / __ '/ __ \/ ___/
  / /_/ / /_/ / /_/ / /
  \__,_/\__,_/ .___/_/
              /_/

===============================
Distributed Application Runtime

Usage:
  dapr [command]

Available Commands:
  completion     Generates shell completion scripts
  components     List all Dapr components. Supported platforms: Kubernetes
  configurations List all Dapr configurations. Supported platforms: Kubernetes
  dashboard      Start Dapr dashboard. Supported platforms: Kubernetes and self-hosted
  help           Help about any command
  init           Install Dapr on supported hosting platforms. Supported platforms: Kubernetes and self-hosted
  invoke         Invoke a method on a given Dapr application. Supported platforms: Self-hosted
  list           List all Dapr instances. Supported platforms: Kubernetes and self-hosted
  logs           Get Dapr sidecar logs for an application. Supported platforms: Kubernetes
  mtls           Check if mTLS is enabled. Supported platforms: Kubernetes
  publish        Publish a pub-sub event. Supported platforms: Self-hosted
  run            Run Dapr and (optionally) your application side by side. Supported platforms: Self-hosted
  status         Show the health status of Dapr services. Supported platforms: Kubernetes
  stop           Stop Dapr instances and their associated apps. . Supported platforms: Self-hosted
  uninstall      Uninstall Dapr runtime. Supported platforms: Kubernetes and self-hosted
  upgrade        Upgrades a Dapr control plane installation in a cluster. Supported platforms: Kubernetes

Flags:
  -h, --help      help for dapr
  -v, --version   version for dapr

Use "dapr [command] --help" for more information about a command.
We are not going to get into the details of Dapr configuration in this part of the Dapr articles series.
For now, we need to initialize Dapr with basic configuration and we can accomplish this with a single command:
dapr initAfter running this command, dapr is going to update its components to the latest version and setup docker containers as:
- Redis
- Zipkin
- Dapr placement
Great! We just have set up Dapr, now it’s time to launch previously prepared applications.
Launching Previous Applications
To launch our ASP.NET Core Bank application, we need to go to our project directory via PowerShell and run this command:
dapr run --app-id bank --app-port 5000 -- dotnet runWith this command, we are going to launch an application named ‘bank’ on port 5000.
To launch our app we need to pass Dapr information on how to run it, which is the dotnet run command. That’s it! Our application is available, and we can start sending some requests to it.
Testing Requests
According to the logic of our application, in order to see what is the current balance of our bank account, we need to deposit some money to open an account.
With the help of Postman, we are going to deposit some money. We are sending requests to localhost:5000.
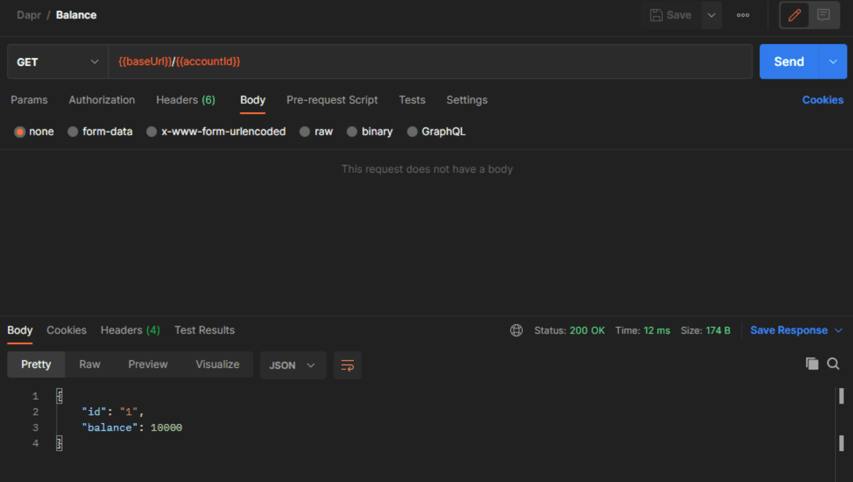
Et voila. We just deposited 10000 to our account. Our account number is 1, and we are going to use it in the future.
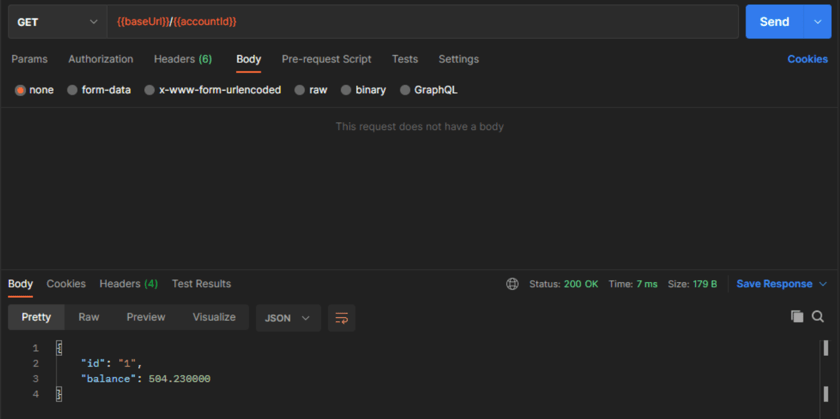
On the server, our logic of getting state from a state store via Dapr.Client worked, and we were able to mutate the state. It’s time to see what our current balance is.

That’s it. This is how simple it is.
Let’s now withdraw some money.
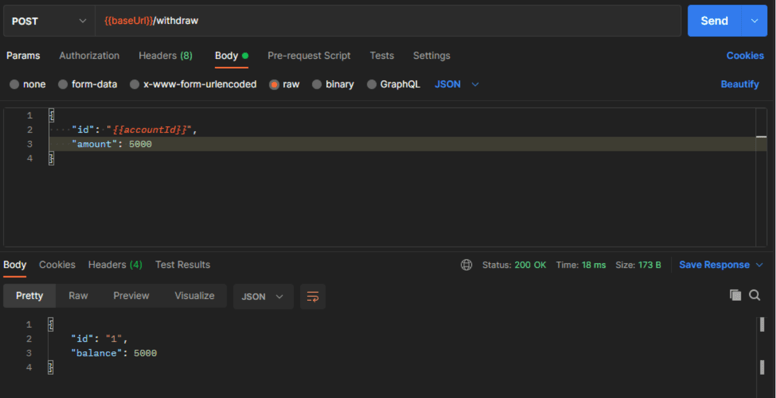
We took 5000 out of our account.
Let’s do that twice. At the second call, we should get a Bad Request, according to the logic we have implemented.
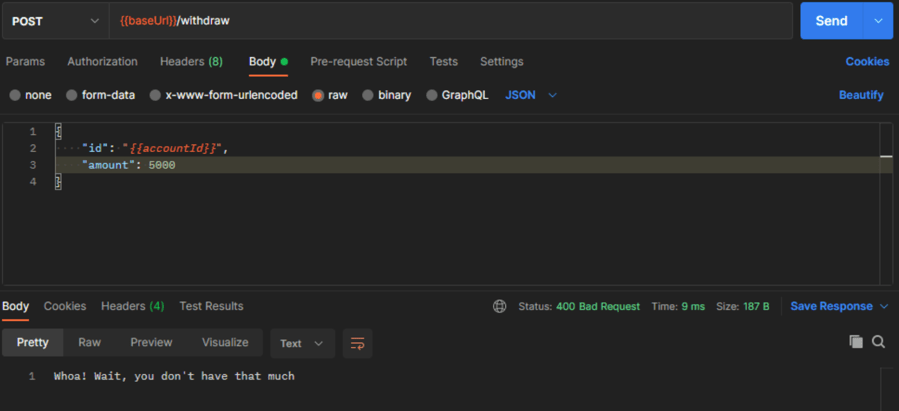
This is what we got at the second request.
What is going underneath the Dapr Client?
The default Dapr configuration uses Redis as a state store. Every operation we made via request has changed the state and updated entries inside the Redis.
As you can see, we don’t have any StackExchange.Redis references added to our project, and we are not even using the word Redis inside the code. We are just using Dapr and StateStore.
In the future, you might decide to move from Redis to something totally different, like SQL Server, and the only change we need to do is just adjust the Dapr configuration (I will tell you in the next article on how to do that) to indicate that we are using SQL Server as a state store.
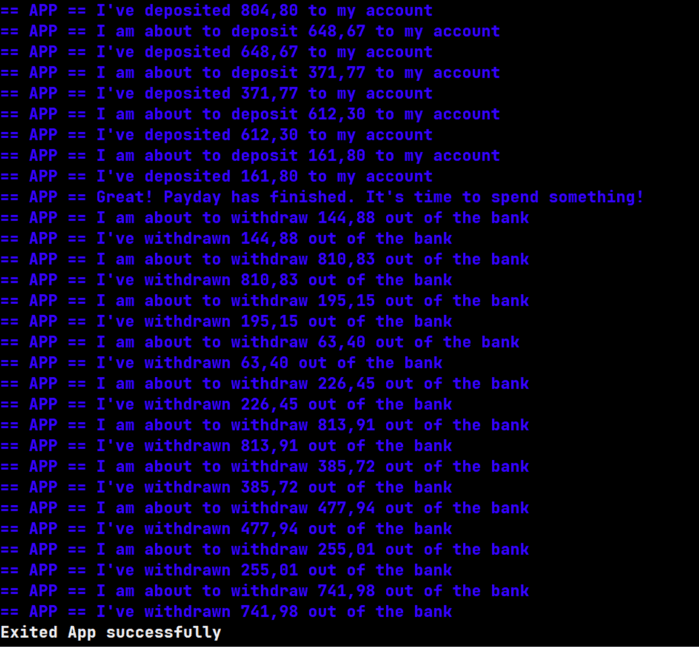
Great! Now it’s time to simulate payday with our Console Application.
Simulating Payday
When we launch it, first we are going to make some deposits to our account (with number 1) and then some withdrawals. It’s going to be delayed, so after every operation, we will wait up to 5s.
In the new tab of PowerShell, let’s go do the directory of our Console Application and launch this command:
dapr run --app-id messagepusher --app-port 5020 -- dotnet runWe are going to do something exactly the same as we did with our ASP.NET Core application. However, instead of using the name ‘bank’ and port 5000, we are using the name ‘messagepusher’ and port 5020.
After launching the application, immediately, the console application is going to communicate with the ASP.NET Core application via topics/messages.
When we run our application, we will see some logs out if it is inside Powershell:
To verify that those operations were made, we can send a request via postman to get our current account balance.
That’s it. Using publish/subscribe pattern (or pub/sub) we have communicated via Dapr.Client with our ASP.NET Core Bank application, not by using normal HttpRequests, but using messages.
Dapr Example Summary

As you can see, using Dapr lets us focus on what is important – the logic standing behind the application.
We don’t have to worry about making implementations of connectors to the State Store such as Redis/SQL Server, message broker, and many more. We are simply injecting DaprClient class, to talk to the state store and other things, and perform operations we want.
It took us a few lines (up to 5) of code to set up the Dapr and use it. This package can really speed up the process of creating distributed applications and make them even more stable.
In the next article of this series, I am going to show you how to configure Dapr, and what are its hosting possibilities.